
One Room Challenge Week 6 – 3 DIYs for the price of one!
We’re almost there folks! One more week to go til the final reveals not just from myself but from all of my fellow ORC guest participants over at Calling it Home! So as not to give everything away, this week I’m giving you a slightly different post and share a break-down of the three big DIY projects that I just completed for the guest room, while trying not to spoil the final touches in the room. Here goes…..
Number 1 – Hiding the TV
If you’ve been following along the last few weeks you are very familiar with the Owl and Pig portraits that have been sitting over the fireplace, but you might not remember that there is actually a TV hiding behind those guys. I don’t think that the TV necessarily needs to be hidden in every room (our living room TV is very much front and center) but since this one won’t be used every day and is the first thing you see when you walk in the room, it was important to find a solution to hide it.

First up, I bought the portraits from Etsy, printed them through Shutterfly, and mounted them in two Ribba frames from IKEA. Since they weren’t wide enough to cover the span of the TV, I used 1×3 boards stained in the same Dark Walnut finish as the mantel to add a second frame (they actually look like so expensive now that I might use this hack with other IKEA frames!) I then attached two Eye Bolts to each so I could mount them to the support structure.
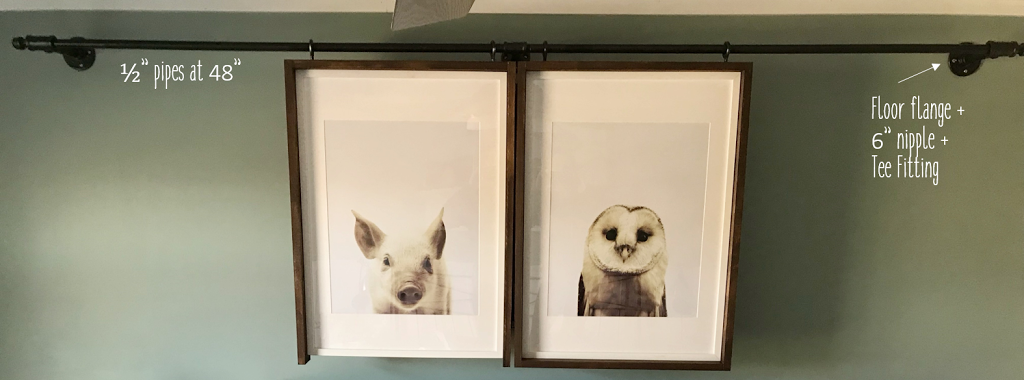
To make the mount I used a combo of 1/2″ and 3/4″ plumbing pipe/fittings – the pipe and center support are 1/2″ but I used 3/4″ fittings for the two side supports so I could easily slip the pipes in. I spray painted the whole structure in Rust-Oleum Hammered Black and hung it right below the crown.
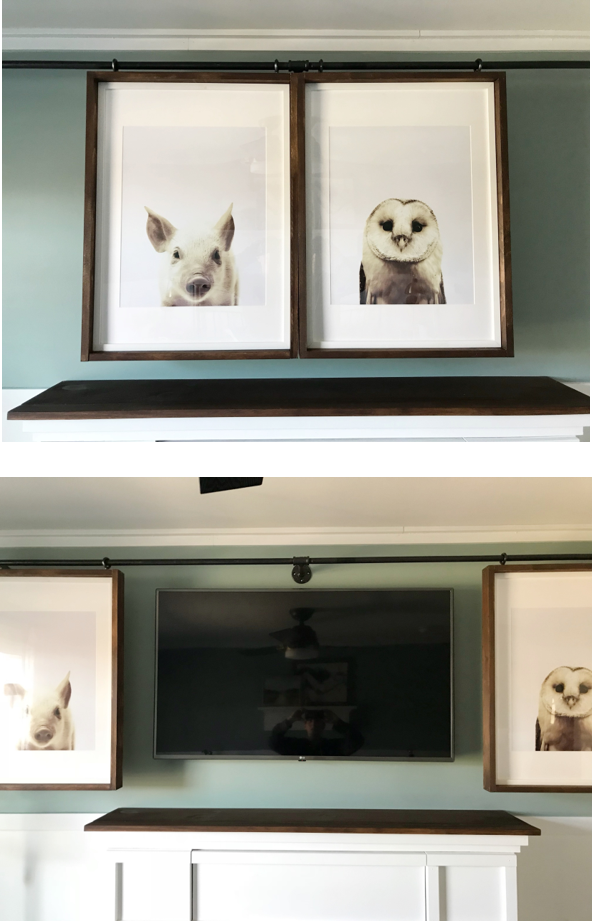
There is good amount of space between the frames and the TV, and they slide open and closed really smoothly so mission accomplished on this one.
Number 2 – Turning a Clock into a Mirror
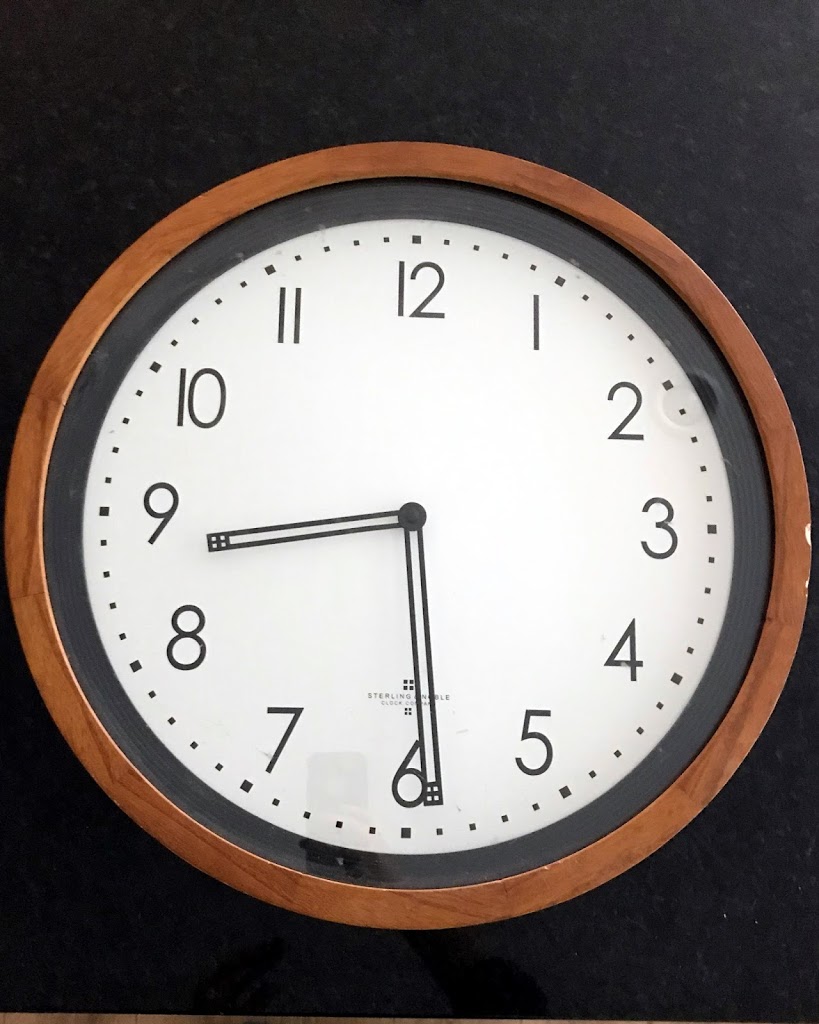
I love the look of round hanging mirrors (like this one from Target) and I had been holding onto this old broken clock for a while so I figured why not try to re-purpose it before buying something new.
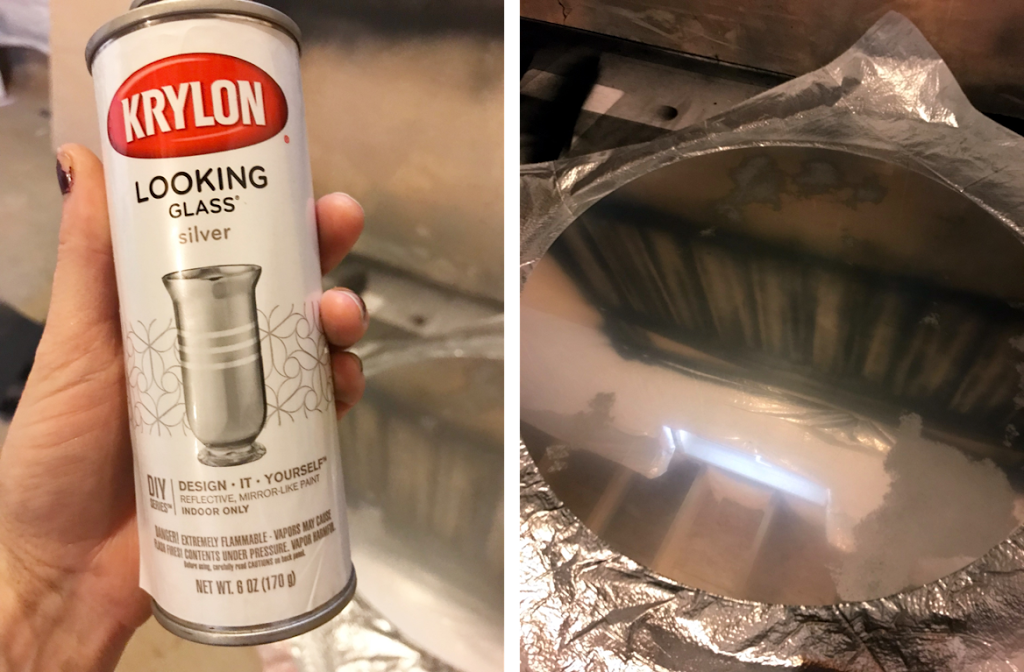
I was able to disassemble the clock easily so I could pop the glass front out. I then spray painted the back of the glass with Krylon Looking Glass. The directions say to use about 5 thin coats, but I ended up with closer to 9 to get an opaque look. The final product has an antique finish, so if you’re looking for something to do your make-up in I’d suggest buying something with a clearer finish.
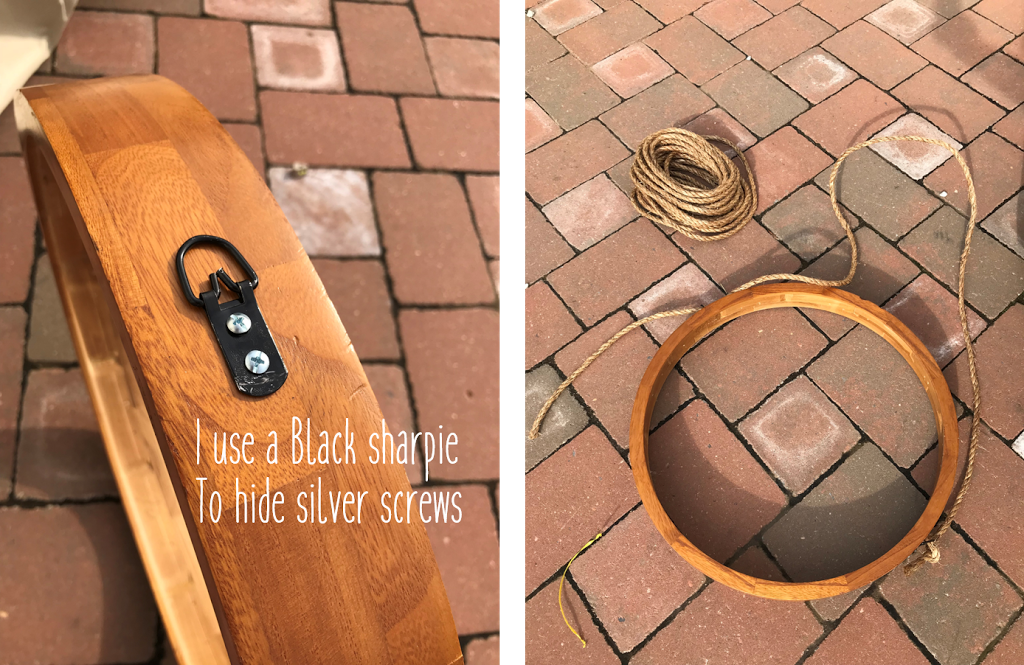
The frame itself was in pretty good shape so I just used some furniture repair markers to touch up any scuffed spots, and then I attached two D-Rings to the either side of the frame. I had some thick rope leftover from my Powder Room shelf that threaded through and knotted around each hook.
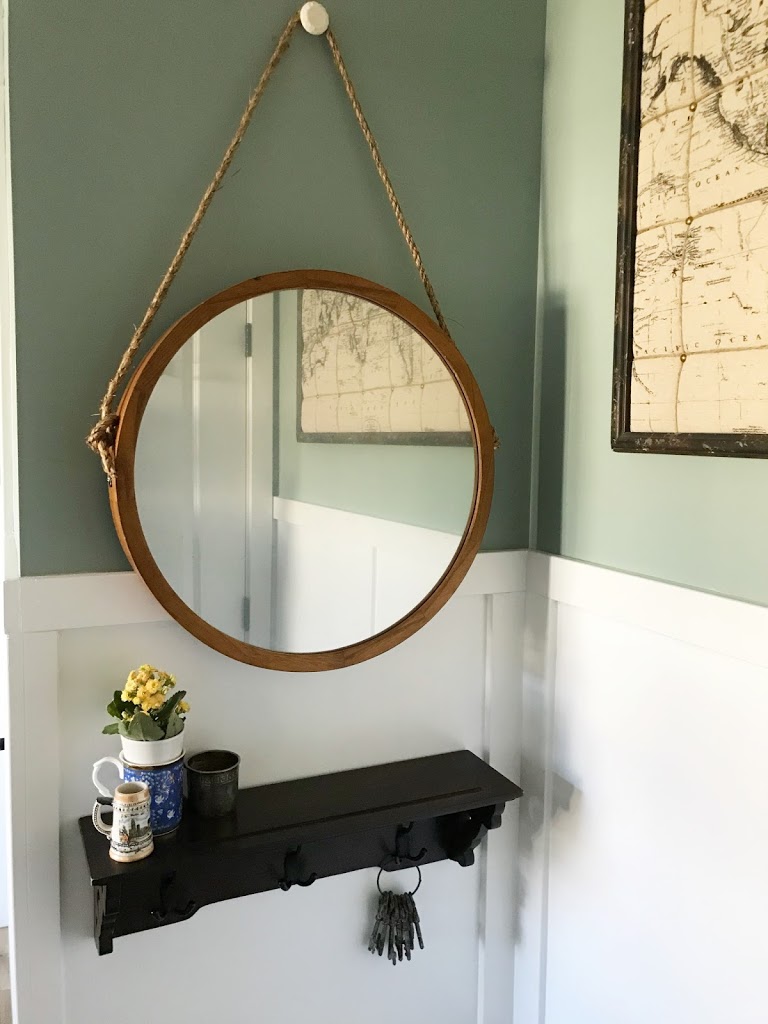
When the mirror was dry I popped it back in the frame, re-attached the back, and hung it in the “entryway” over a small shelf that used to hang in our foyer. I love using cabinet knobs as an alternative to wall hooks (you can just screw them directly into a wall anchor) so I picked this one up at World Market and adjusted the rope to a good height. I added a few of the cups my dad has brought back from his worldly travels, a set of skeleton keys I picked up a Micheals a while back, and a cute little flower from Ikea to complete the look.
Number 3 – Oversized Book Art
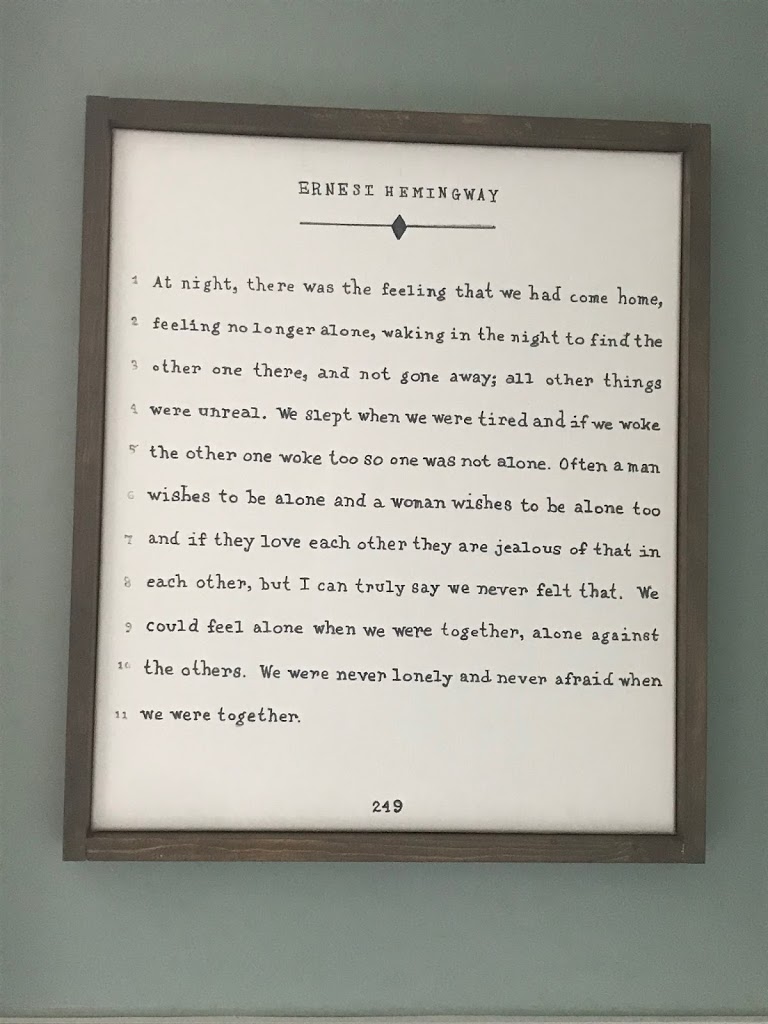
I know some people aren’t into using text as decor, but I think it can add a great graphic element to a space if done right. I like to create my own text art using quotes that are meaningful to me and my family – in this case I used a passage from “A Farewell to Arms” that was read at our wedding (one of my best friends actually made a really sweet framed version of this passage for us but it sadly broke in our move so I’ve been looking for a way to bring it back into our house ever since!)
I had stumbled across tutorials like this one on Pinterest and fell in love with the look of these oversized book pages. I think most people print them out as engineer prints and then frame them (which I’m not knocking as it’s a great technique) but I like to paint things directly on canvas whenever I can. And since I’m super Old School and stick to the “the process is part of the art” philosophy I have my own overly complicated way of transferring text to canvas.
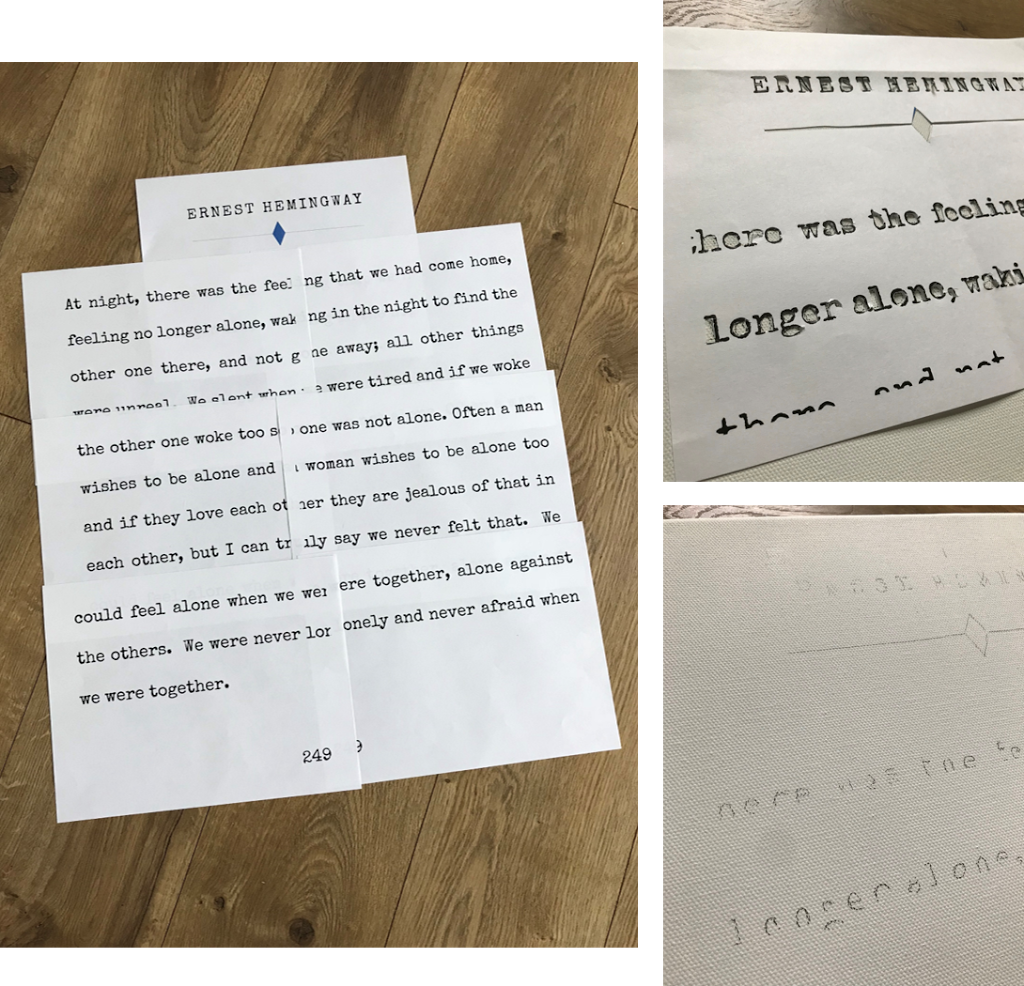
First, I work up the text on my computer, and then I print it out in multiple pages so I can transfer it at scale. Next, I use an Exacto knife to create a rough stencil – for larger fonts I’ll cut out the whole letter but for smaller fonts I just focus on the outlines. From there I use a pencil to lightly trace the outlines onto my canvas, which I first painted with a coat of white chalk paint.
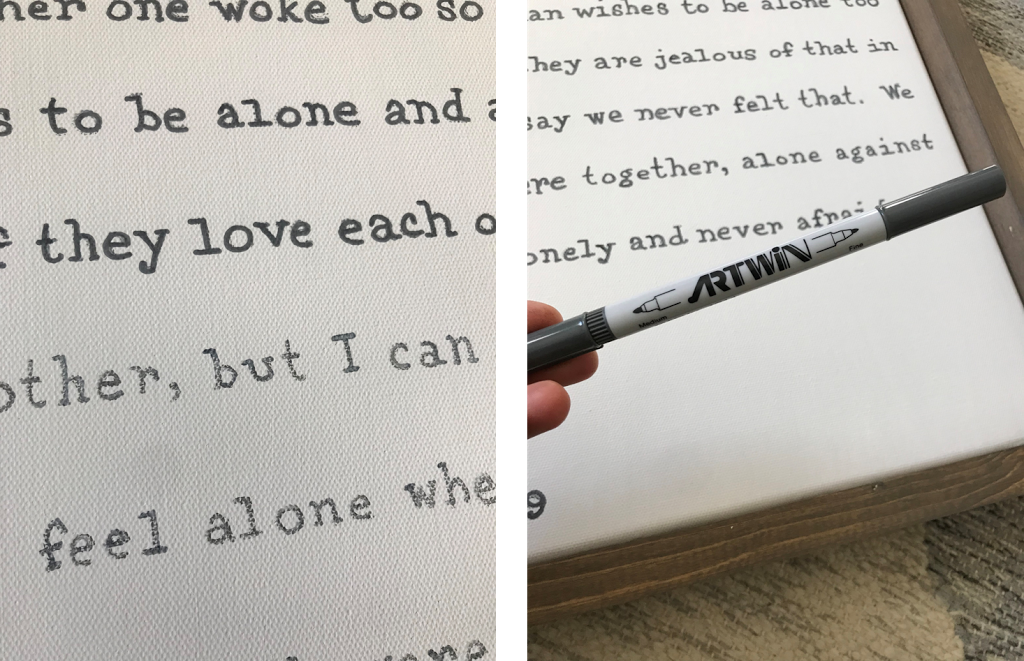
I was planning on using a gray paint marker to write the final text, but I could only find silver, so I settled on a Gray Sharpie. That ended being a really bad choice. It turned out OK, but was a lot more muddled then I wanted so I ended up going back to the craft store and found a Dark Gray art marker that worked SO MUCH BETTER! You can see in the pic above the difference between the top 3 lines and the bottom 2.
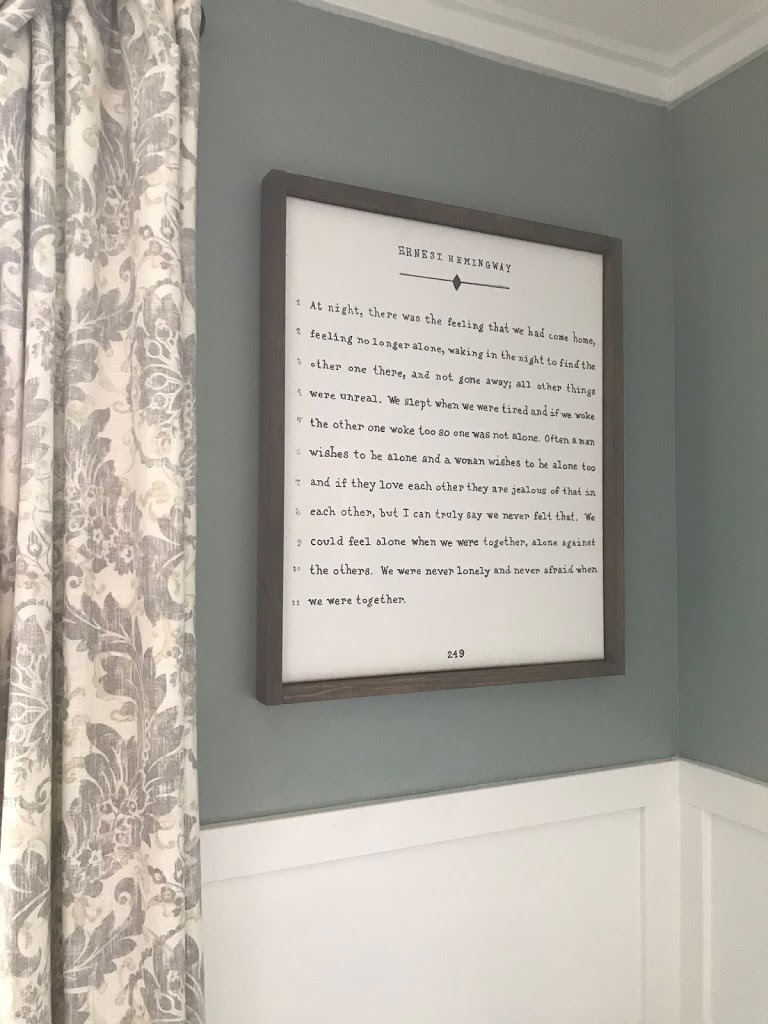
If you’re going to DIY anything on canvas I highly recommend also adding a frame! I just use 1×2 pine boards that I fit to the canvas and stain (this one is in Varathane Briarsmoke). I’m so happy with how this one turned out that I kinda want to put them all over the house.
The guest room is pretty much done now save for a few punch-list items that I’m going to knock out next week. I’ve been having fun shopping and styling and I can’t wait to show you the final touches, including all of the goodies I picked up from the Target/Magnolia Hearth and Hand launch – check out my mood board and links below to see what I snagged and make sure you come back next week to see how it all comes together!
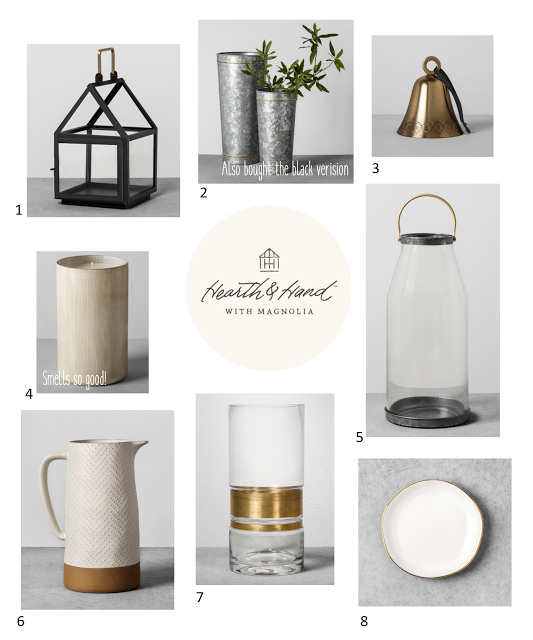
1. Small Black House Lantern | 2. Large Galvanized Silver Vase | 3. Vintage Brass Bell
4. Silver “Bergamot & Mahogany” Candle | 5. Medium Glass Jug Candle Holder
6. Cream Textured Stoneware Pitcher | 7. Large Glass Vase with Brass Wrap | 8. Cream/Gold Stoneware Bread Plate


Comments
great idea on the hiding the TV! so creative and I have never thought about that!! beautiful vignette on the mirror and floating shelf too! Can't wait to see it all next week!
I'm so glad I simplified my original plan for the TV – total lightbulb moment. And I'm so glad you like the mirror/shelf vignette – it turned out to be my favorite spot in the room. Good luck in the final push!!
That artwork is so cool! And I love the DIY mirror you made! Great inspiration!
Thanks so much Jennifer! Good luck finishing your powder room – I love your wallpaper!! I actually have my eye on fabric that is really close to that pattern : )
Such a cleaver idea hiding the TV with sliding art!
Thank you so much for the kind compliment! I had thought of a much more complicated solution at first, but sometimes the easiest approach is the best!